

Who hasn’t the dream of having a Hi-Fi music streamer on the desk attached with their speakers? I know many of us or I can say, most of us have that dream. Products like Bluesound Node 2i, Sonos Connect, Pro-Ject Pre Box S2 Digital, etc. are some best-selling streamers in the market. Those devices are feature-packed but also have higher prices. So buyers, who don’t want to spend too much on music streamers have only a few options left. I have made another post for ‘Best Budget Hi-fi Music Streamers’ too previously for them. Most of the budget streamers have been created keeping Raspberry Pi in the center. Raspberry Pi music streamer may cost less but need a lot of tweaks, which is not everyone’s cup of tea. So today I will tell you, how to turn your old Smartphone into a hi-fi music streamer without spending anything extra.
Things You Need
Here are few things which are needed to turn your old Smartphone into a hi-fi music streamer. Please note that phones vary from brand to brand so my entire setup process may not be the same as yours, but everything will be as close as possible.
Smartphone (Android)
You first going to need an old Smartphone. Nowadays brands releasing a new phone every day and people rushing to buy that new phone. At end of the day, you may have a secondary phone which is completely fine but lying around the desk collecting dust. We are using that old phone as an excellent wireless hi-fi music streamer today. In this project, we need two Smartphones actually, the old one you not using anymore and the new one you just have bought.
In this project, we need only Android Smartphones. The specifications of your old phone don’t matter that much. Any phone with at least 2GB ram, 16 ROM, a good battery life, type c input (Micro USB works too), working touch display, and working Wi-Fi is required. That old phone should have running Android 8+ and having wireless charging is an extra benefit. I am using my 2-year-old 99$ Realme C2 as my old phone, and please avoid Oneplus phones for their poor external DAC support.
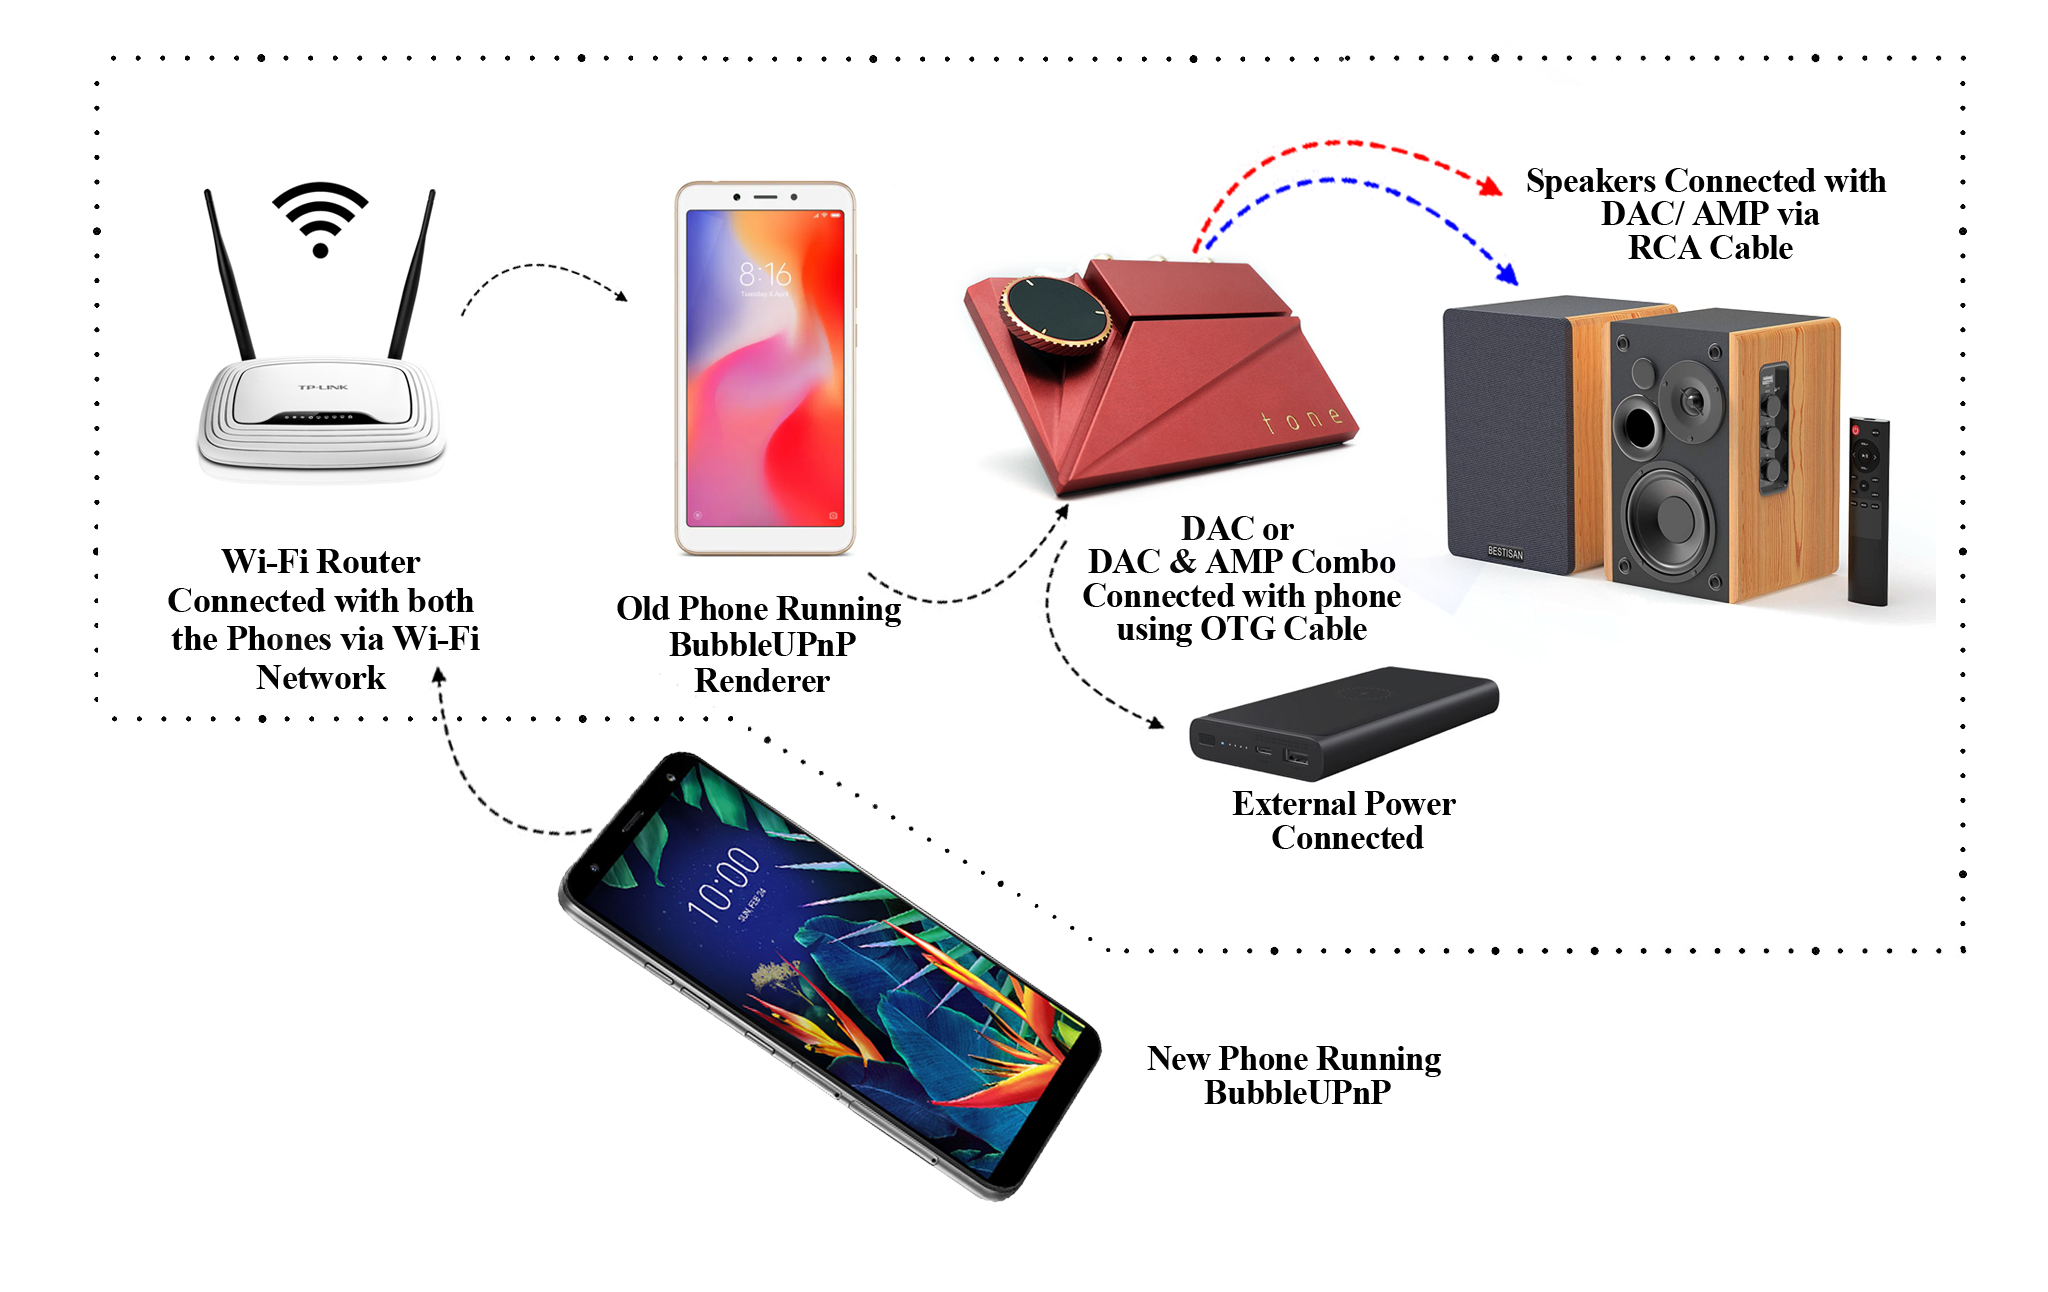
Wi-Fi Router

I know we all have Wi-Fi routers in our home. In this project, we need that because wireless streaming not going to possible without a router. I am using a basic 150 Mbps TP-Link router in my home for a wireless internet connection. Just connect both the phones (Old phone and New phone) to the same home Wi-Fi network via this router. That’s it.
DAC or DAC AMP
Now as we talking about Hi-Fi music streaming, a DAC or DAC AMP combo should be in the chain. You have to connect the DAC through the old phone’s micro USB /Type C port using an OTG cable. Make sure your old phone has OTG support. Try to use a DAC or DAC AMP that has separate power input so that it doesn’t suck power from your old phone’s battery. I am using Khadas Tone 2 pro and it has two separate inputs, one for USB and another for power. Now as the DAC is constantly connected with the phone’s type C / Micro USB port a separate Y splitter cable or wireless charging is super useful. Or you can detach the DAC and charge the phone when you not playing anything.

BubbleUPnP
For this project, I have used a very good android app called BubbleUPnP. If you want to know what is UPnP and how it works then read it. BubbleUPnP can be downloaded from the Google Play store without any charges but it has a paid version too. It’s upon you, for this project paid version is not required or you can buy one license and it will work on 5 devices. Now you have to install BubbleUPnP on both Smartphones. The old phone which is now going to work as a music streamer, uninstall as many old apps as possible. Also, keep it in Airplane mode with Wi-Fi enabled. Now your setup should look like this.
App Settings
Once both the phones are connected via the same Wi-Fi network and running BubbleUPnP, only some app settings are needed to be changed. Here are the settings to turn the old Smartphone into a hi-fi music streamer.
Settings in Old Phone’s BubbleUPnP
These are the following settings you have to change in BubbleUPnP.
- First, open the app BubbleUPnP,
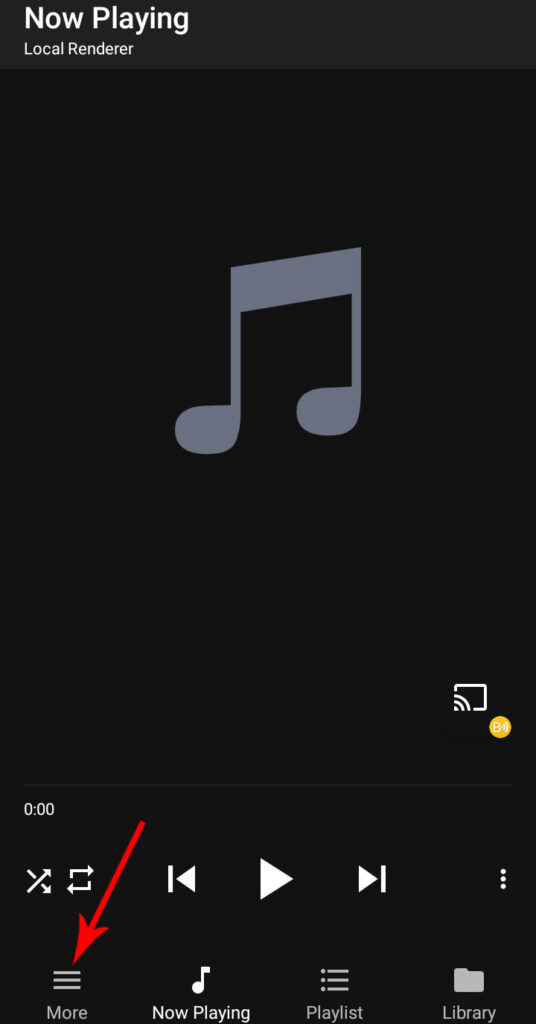
- The ‘Now Playing’ home screen of the app should look like this image below,
- Tap on the ‘More’ option,
- Tap the gear like ‘Settings’ option,

- In setting first tap on the ‘Disable Doze’. And disable the battery optimization so that the app can work even when the screen is off,
- Now in settings tap on the ‘Local Renderer’,


- Inside the local renderer setting; first, change the name of the network by tapping the ‘Network Name’ option. For example, I have changed the name to Old Phone Streamer. And also turn on the ‘Enable’ and all other options. See the below Image.
- Now scroll down and tap on the ‘FFmpeg Audio Decoding’ option. Set it to none natively supported audio formats + Internet radio.


- Go back to the setting page, and tap on the ‘Local and Cloud’ option. Again change the name to ‘Old Phone Streamer’ in the ‘Network Name’ option and change the settings as per the below image.


Settings in New Phone’s BubbleUPnP
Now change the settings of BubbleUPnP in your new phone, which you going to use as a remote.
- Open the app BubbleUPnP and in the ‘Now Playing’ screen tap the ‘More’ option and go to the settings. * No need to enable ‘Disable Doze’ in the new phone.


- Now tap on the ‘Local Rendered’ option and change the ‘Network Name’ option. I am naming it ‘Audio Glorye’. Also, change the other options as per the image below.
- Go back to the setting page, and tap on the ‘Local and Cloud’ option. Again change the name to ‘Audio Glorye’ in the ‘Network Name’ option and change the settings as per the below image.


Now restart the BubbleUPnP app on both the phones and if possible restart both the phones.
How to Start Streaming
Keep the old phone connected to the DAC and open the BubbleUPnP app in it and let it on the desk. Now you don’t have to touch it anymore.
Again open the BubbleUPnP app on your new phone and, once you in the ‘Now playing’ screen, tap on the wireless devices option on the right. Here you can see the device ‘Old Phone Streamer. Select it and tap on the three dots of the old phone streamer device and tap on the ‘settings. In the settings, tap on the ‘FFmpeg Audio decoding’ and select ‘Never Use’.


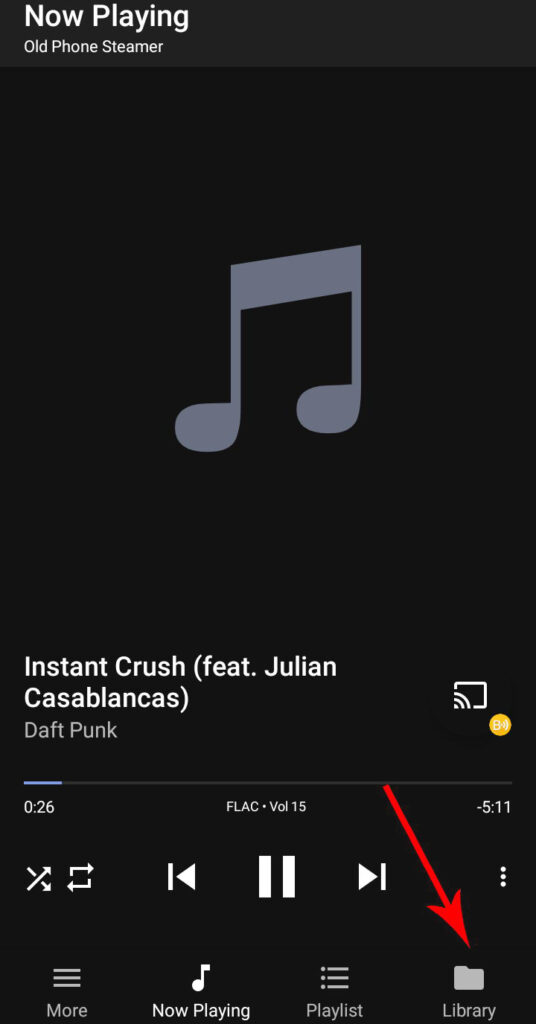
Now go back to the ‘Now playing’ screen’ and tap on the ‘More’ option. Tap on the ‘Library’ option and select the ‘Local and Cloud’.


Now come back to the ‘Now playing’ screen and select the song you want to play either from your phone’s storage or services like Tidal and Qobuz.
Conclusion
Now you have a hi-fi music streamer with a touch screen, Wi-Fi, & Bluetooth by which you can stream offline music and music from services like Tidal and Qobuz. The mentioned settings could be a bit confusing so take your time and follow the steps one by one. There is much other option in the BubbleUPnP app which I have not covered here to make the article simple which you can explore as per your requirements. So this is my guide for how to turn your old Smartphone into a hi-fi music streamer, if you know any other simpler way do share in the comments too.

Graphic Designer by Profession, and Music is my hobby. Can’t recall when I had started digging the Audiophile rabbit hole, but this Website was created in 2019 to showcase my passion for music. I am not an Audiophile, I call myself a Music Enthusiasts and my goal is to pass that enthusiasm to my readers.
I like how this works, but have a few questons:
1) Cannot get Tidal MQA quality. Anyway to go about this?
2) I think the remote function is limited to 30 minutes for each session in the free version. Does one have to buy two licences of the paid one?
If you want Tidal or offline MQA playback, you have to use USB Audio Player Pro. USB Audio Player Pro also have UPnP services in build. But as you know the app USB Audio Player Pro and MQA plugin is not free.
Yes the free version has some limitations. That’s why buying the BubbleUpnP is a good idea.
Hi, good idea, I have done the same some time ago and I have set additionally DLNA server on my old Z3 compact. In my opinion FFMPEG decoding makes music sound better, why your advise is to turn it off?
Audiophiles loves bit-perfect decoding, that means playing the files as it is. FFMPEG decoding is helpful reducing the CPU load by compressing & resamplaing the sound. Sometimes FFMPEG decoding ads certain filters which makes some songs pleasing too.
Hi Palash, This is a really good instructional guide and would be easy for new users to understand. Well done!
Thanks.
Hi Palash, thanks for the article. I was looking at getting a Bluesound node but may go this route instead now that I need a new phone. My budget 80s hifi system uses a Pioneer SA-950 Amplifier. If I want to plug into this I would just need the DAC and not the DAC AMP correct? Any recommendations for a DAC without AMP?
Overall budget setup would look like this:
Pioneer PL-950 Turntable
Pioneer SA-950 Amp
Pioneer SG-550 Equalizer
Pioneer S-910 Speakers
Samsung Android S8 as streamer
DAC (TBD)
Samsung Android S22 to control everything
PC with audio on HDD that I’d like to stream over network
Thanks!
Hello Jason, yes you don’t need DAC+AMP combo. U just need a DAC to connect with your Pioneer SA-950.
For budget options you can try Schiit Modi 3+ ( Balanced sound) or Topping E30 ( More technical sound).
Schiit Modi 3+ works well with android mobiles devices too.
Hi Palash, thank you for the info. Really appreciate it. Would this setup still work using the S8’s internal DAC prior to purchasing a standalone?
Yes it will work.
Hey, nice article easy to follow and I got my old Huawei up and running plugged into my amp and speakers.
The sound is a bit washed out so a dac upgrade definitely in order.
One thing I wanted to ask is do you have any advice about getting it to turn on and load bubble automatically?
As it stays plugged in the Huawei turns itself on when power turns on to the charger which is powered by an Alexa plug, I just want bubble to open on startup, have you managed this?
It seems to load in background and I wanted to see if I could get it to load up in full screen.
Thanks for the comment.
Yes it can be done very easily. A app is available for such task.
The app called Autostart-no Root. (https://play.google.com/store/apps/details?id=com.autostart&pli=1)
The app is very simple and easy to use.
After installing the app and setting it up, go to android app setting and turn on ‘autostart’ in all 3 apps like (bubble UPNP, Bubble UPNp License, and Autostart)
Also enable all the permissions in this 3 app. And good to go.
Let me know if it works.